

Last time, we looked at how to get up and running with Visual Novel Maker as soon as possible using its built-in assets and template project.
Today we’re going to take a look at how you can use your own assets to create something unique to you! Because built-in assets are all well and good — and Visual Novel Maker certainly has some lovely default artwork and character designs — but if you’re serious about getting creative, you’ll want to take control of as much about your work as possible.
That means, among other things, creating your own characters with which to tell your story. So let’s take a look at that today!
Kick off by starting a new project, this time using the Empty Project template. Once the editor window appears, head on up to the toolbar and choose the Database button. You can also choose Database from the View menu for the same effect.
![]() The Database is where you store all the information that is used to build your game, with the exception of the scripts for the scenes. Those of you familiar with the RPG Maker series will be right at home; it allows you to set up everything from the main cast of your game to important interface elements such as the title screen and suchlike.
The Database is where you store all the information that is used to build your game, with the exception of the scripts for the scenes. Those of you familiar with the RPG Maker series will be right at home; it allows you to set up everything from the main cast of your game to important interface elements such as the title screen and suchlike.
First thing we’re going to do is set up a new character. There are a few steps to this process; we’re going to begin with importing the graphic files for the character. Look at the Collections list in the left panel and choose Character Expressions.
 “Expression” is the term Visual Novel Maker uses to describe an individual art asset (either static or animated) for an individual character. They’re most typically used to reflect different moods or emotions, hence the name, but can also be used to organise character costumes and suchlike, too.
As with anything programming-related, it pays to be organised right from the get-go, so let’s start as we mean to go on. We’re going to be importing some graphics for MoeGamer mascot Midori, so let’s set up a folder to keep her files in. Head on down to the Records option in the lower-left panel, right click in an empty space and choose New Folder.
 This will create a new folder in the Records panel. Click on it to view the “record” (or the folder, in this case) and rename it to “Midori” by filling in the Name field.

For simplicity’s sake, we’ll assume Midori is only going to have one outfit for now. If you’re using characters with multiple outfits (school uniform and casual clothes, for example, if you’re making a “traditional” VN) then it’s a good idea to create a subfolder within the character’s main folder for each of their outfits. For now, just right-click our new Midori folder and choose New Record.
The new record won’t be visible immediately, so expand Midori’s folder by clicking the little arrow next to it, then select our new record. Rename it to an appropriate name for the expression we’re about to import — I’ve gone with “Happy”.
 Now for the fun bit — importing some graphics! In order to do this, you’ll obviously need some… well, graphics. The art of character design is obviously beyond the scope of this article, so suffice to say for now that you’ll probably want to use full-body images of your characters, with the height of the image just under double your game’s screen height. Visual Novel Maker defaults to making 720p (1280×720) games, so a height of about 1150 pixels works well. Make sure your files are .png format and have a transparent background.
The reason for this is we don’t want to see the whole character on screen at once, and making them about this size allows us to see their face and some of their body; these are the proportions at which the example characters included with Visual Novel Maker are made, too. The other thing is that if you use full-body images, you can pan up and down the whole character rather than them being cut off at the thighs or something — good if you want to do vaguely cinematic things with the camera.
For now, click Add…

Hmm, nothing to import. What gives? Well, in order to be able to use graphic resources in our project, we have to import them to the project’s general pool of resources first. Cancel out of this window and head back to the toolbar; this time click on the Resource Manager button.
![]() The window that appears is where we import all the external, previously prepared files that we want to use in our project. That includes graphics (characters and backdrops), music, sound effects, fonts, movies and all that other good stuff.
The window that appears is where we import all the external, previously prepared files that we want to use in our project. That includes graphics (characters and backdrops), music, sound effects, fonts, movies and all that other good stuff.
Choose the Graphics/Characters folder on the left then click the Import button. Choose your files and hit OK. If you happen to run into a strange error message, browse to your project’s folder on your computer (you can quickly get here by choosing “Open Game Folder” from the “Game” menu) and make sure there’s a subfolder called “Characters” in the resources\Graphics folder. This may not be created automatically if you start with an empty project.
 Once your files are imported, they’re ready to use, but it’s worth knowing there are a couple of useful ways to keep them organised. Firstly, before importing the files, you can use the Prefix and Suffix options beneath the Import button to automatically append something (like a character name, say) to the beginning or end of the filename.
Secondly, you can put resources into groups. To do the latter, right-click on one of the imported resources and choose New Group.
 Then right-click the new group that gets created and choose Properties… to rename it. After that, just drag the resources into it to keep them nice and neat.
 All right. Back to the Database, and let’s try that Add button in the Character Expressions collection again.
 Success! There she is. Notice that this window only displays resources in the Characters folder, which is why we couldn’t just drop the files in the Graphics folder if you got the error message earlier. It should hopefully also be self-evident how useful those Groups will be if you have a lot of characters in your game.
Pick an appropriate piece of art for the expression, then hit OK. After that, repeat the process for the other expressions, and you’ve nearly got a character ready to use. Don’t worry about the other settings in the Character Expressions window for the moment; you only need those if you’re making animated characters. Let’s not run before we can walk!
 Nearly ready to bring her to life! Head on over to the Characters entry in the Collections pane on the left.
There’s already an unnamed record set up in here for an initial character, so all we have to do is give it an appropriate name, and it’s also a good idea to set the default expression for them to use when they appear. Use the most “neutral” expression you have for the character — in my example, I’ve used Midori’s “Pleased” expression.
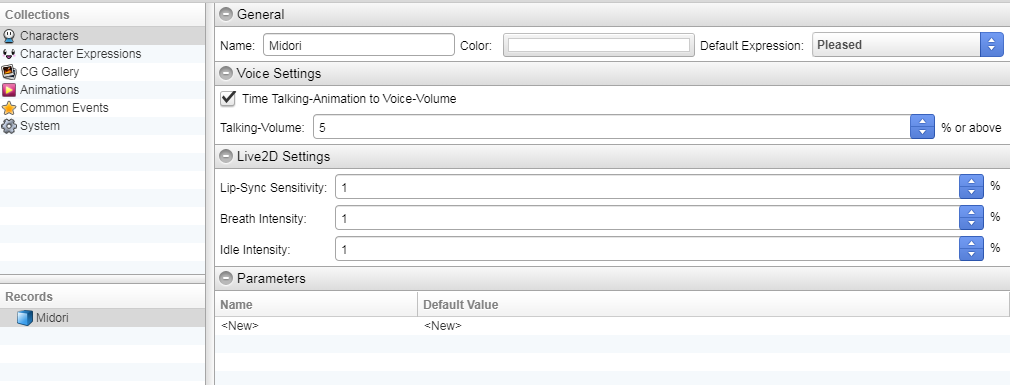 Again, we don’t need to worry too much about other settings for the moment, since we’re not using voices or Live2D. One thing we will come back to in the near future is the Parameters panel at the bottom; this allows you to attach various pieces of information to the character, allowing you to easily track things like relationship values, nicknames or “flags” the player has set through their choices.
That’s all we need to do to get a brand new character up and running! Let’s put her in a scene. Head back to the Scene Editor that we were using last time, and create a new chapter and scene, then right-click the new scene and choose Set as Start Scene. This means it’s the scene the game will jump to when the player starts a new game from the title menu.

Now compose a short scene that introduces Midori. Remember to add a background and music — you’ll need to import these in the same way we imported Midori’s graphics, making sure to put them in the appropriate folders. Backgrounds will normally be .png or .jpg files of the same size as your game window (1280×720 by default) and music can be in .ogg or .m4a format.
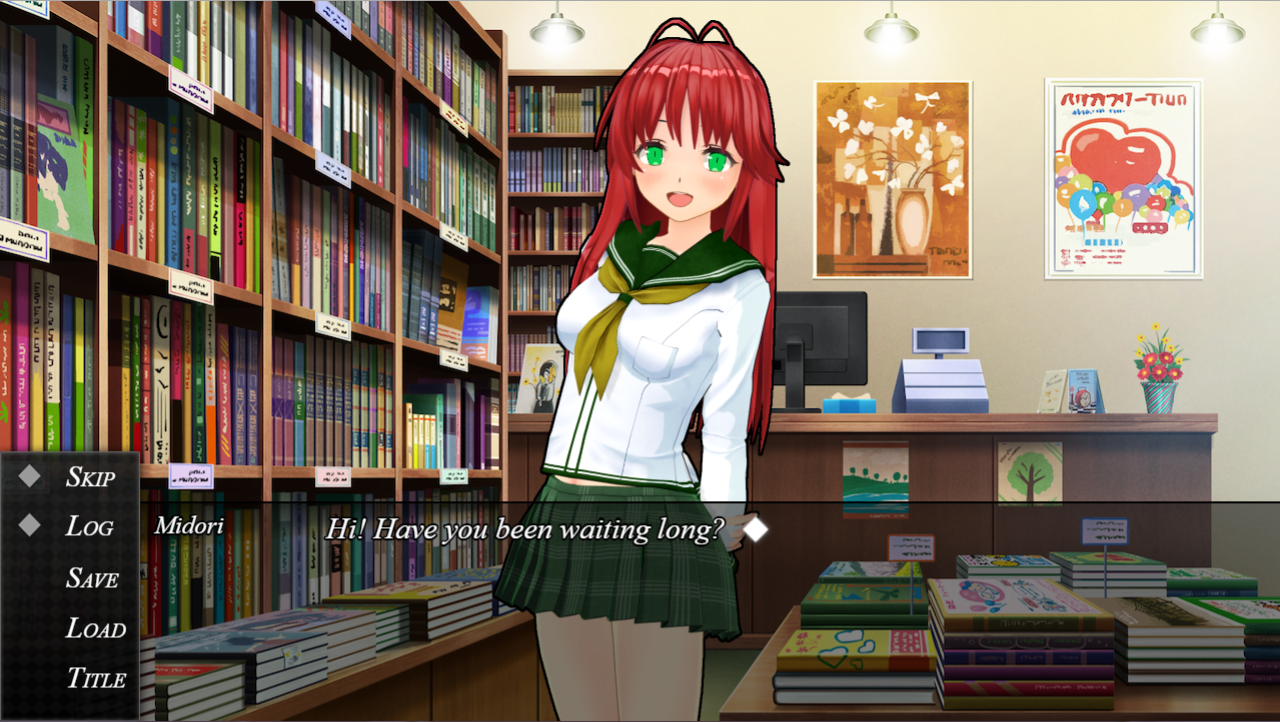
Here’s an example of what you might end up with.
 And here’s how that looks if you test your game right now!
 No more default predefined characters for you! This will go a long way towards helping you make your project truly “your own”. In the next few articles, we’ll look more at how you can customise things like the interface and menus to truly give your game its own identity.
More about Visual Novel Maker
A review copy of Visual Novel Maker was kindly provided by Degica.
If you enjoyed this article and want to see more like it, please consider showing your social support with likes, shares and comments, or become a Patron. You can also buy me a coffee if you want to show some one-time support. Thank you!
![]()

Omg I really want to make a VN haha!
Though everybody knows that it is a serious kind of project and if it is to be done as a side hobby, I won’t expect any real results until years later…
It can be a formidable undertaking, for sure! That said, there’s no reason not to start with a smaller-scale project — a “short story” of sorts — and see how you get on with that before getting too ambitious. After all, there are plenty of commercial VNs on the market with a runtime of less than an hour, and many of them do all right!