

 This article is one chapter of a multi-part Cover Game feature!
<< First | < Previous | Next > | Latest >>
It’s time to breathe some life into our world!
In RPG Maker, you add interactivity through Events. These are lists of commands that are attached to an object on a map, coupled with a trigger of some sort, be it the player walking up to an NPC and pressing the action button, or the number of flatulent wombles the player is carrying in their bag being greater than 13.
Events are essentially a simple form of programming, but don’t run away screaming — you don’t have to memorise lots of different commands, define functions or anything complicated like that. All you need is an ability to think things through in a logical manner and an awareness of the options you have available to you.
Last time, we created two simple maps: a hand-crafted town and a randomly generated dungeon. Let’s start by populating the town with a few NPCs. Open up our project and make sure you’re switched to Event mode, not Map mode. You may remember a brief foray into this from last time, when we set the player’s start position.

Let’s start by putting a guard by the entrance to the dungeon to warn the player that down the steps lies certain death, or possibly just a bunch of slimes. Scroll your map over to where we put our stairwell and double-click on a tile near the stairs. Since we’re making an NPC that will block the player’s passage, maybe put it to one side of the path so it’s not directly in the way.
Double-clicking will bring up the Event editor, which looks like this.

There are several areas to this window, so let’s look at them one at a time.
The Conditions section determines when the event is able to run, or if it even appears on the map. Events can be turned on and off through global switches (which can either be “on” or “off”), variables (which store numerical values), self-switches (four switches specifically attached to the event, items the player has in their possession or actors (playable characters) the player has in their party. If you leave all of them blank, the event will always appear.
There’s a caveat to that: you’ll notice options for “New Event Page” and “Copy Event Page” at the top of the window. Events can have multiple pages, allowing them to change, appear and disappear according to your progress through the game. The most important thing to remember about this is that if the conditions for multiple pages are true at the same time, the latest page takes priority. So it’s best to have your event page with blank conditions as page 1, then more specific pages as later ones. For example, in the case of our guard, we’ll set him up to say different things before and after we enter the dungeon.
Let’s look at the rest of the window first. The Image option quite simply determines what our event looks like. Is it a person? A candlestick? A chest of drawers? Here’s where we decide. Double click the blank space and pick a suitable guard-type character. Take a look in People3 and we should find a suitable candidate.

This sprite picker is used in a few places in RPG Maker. The column on the left is all the individual .png image files that contain sprite sheets in your project. The area on the right shows the complete image and all its elements. Notice how each character has four directions they can face and three frames of animation for each facing. For now, pick one of the left-facing guards — it doesn’t matter which one of the three — and press OK.
Going back to our event window, the remaining sections we haven’t yet looked at include Options, which has four on/off settings: Walking means the sprite runs through its three frames of animation for the direction it’s moving when it moves (if it moves); Stepping means that it constantly animates through its three frames of animation even when standing still (much like in old Final Fantasy and Dragon Quest games, but also useful when using events as objects such as flaming torches, fires and candles); Direction Fix means that it doesn’t automatically turn to face the player when interacted with; and Through means that it can pass through (and be passed through by) other objects, including the player.
The Autonomous Movement section allows us to set up events that wander around on the map, either following set routes, randomly or attempting to follow the player. You can also change the speed of their movement and how frequently they move, i.e. how long a pause they take between each step. For now, we’ll leave our guard on Static.
Finally, an oft-forgotten section of the Event window is the Priority section. Here, you can choose whether an event is below the characters (i.e. on the floor like a pressure pad), at the same level as the characters (blocking their movement) or above their characters (will appear “on top” of them if they occupy the same square. You can also choose how the event is triggered here: the default, Action Button, requires the player to press the game’s default action button for the event to start, which is what we want here. Other options include Player Touch, which triggers the event when the player walks into it; Event Touch, which triggers the event either when the player walks into it or the event moves into the player; Autorun, which runs automatically (assuming the Conditions have been met) and takes over control of the game completely; and Parallel, which runs automatically but doesn’t take control away from the player. For now, leave our guard on Same as Characters and Action Button.
Finally we come to the best bit: the Contents window. Double click in an empty line and this window will appear:

These Event Commands are all the things RPG Maker can do straight out of the box without needing any complicated programming. There are three pages of them; take a moment to have a flip through them, then choose Show Text… on page 1 when you’re ready.

Show Text… is the most basic command, but probably the one you’ll use most frequently. It, quite simply, allows you to display some text on the screen, usually in a message box
The window that appears has a few sections. The Face section allows us to choose an optional image to appear alongside the text to help reinforce who is talking. The Text area is where we type our text — note the thin black line, which indicates where the boundary of the message window will be; don’t go over this!. Background allows us to choose between having our text appear in a message window, in a semi-transparent dim strip or just straight on the game screen. Window Position allows us to place our message area (which is four lines long) at the top, middle or bottom of the screen. And Preview… allows us to see roughly what our text will look like in game, assuming you’re using the default font.
Choose an image for the guard — you’ll notice there’s a People3 set of faces to correspond with the People3 sprites we chose earlier — and add some text for his dialogue. Hover your mouse pointer over the text area to get a tooltip with some useful codes you can add to your messages to fiddle with their appearance; in the example above, I’ve used the \c[n] code, which changes the colour of the text after it to colour n. Colour 2, in this case, is red, and colour 0 is the default white text. The result of \c[2]Guard\c[0], therefore, is this:

And that’s all there is to creating a simple NPC. Let’s add a bit extra to him, though, so he says something different if we’ve already been to the dungeon. Click the New Event Page option at the top, set up our image to be our guard again, then tick one of the Switch options and press the “…” button to bring up the Switch picker.

Click on Switch 0001, type “Been to dungeon” in the Name field, then press OK.
Switches are on-off markers that RPG Maker keeps track of while a player is playing, and saves in the player’s save game file. You’ll likely use a great number of them throughout your project for everything from keeping track of what point in the main story your player is at to determining whether certain sidequests have been completed. Here, we’re simply going to set the switch to ON when the player goes into the dungeon for the first time, but before we do that, add a bit of new dialogue to our guard that reflects his awareness the player has braved the challenges of our dungeon.
Press OK on all the open windows to confirm our changes and put our guard in place. Now right-click on the transfer event we created on our stairwell last time and choose Edit. We’re going to make a small change.
Double click on an empty line in the Contents window for this event as before, and choose Change Switches. Make sure the switch in question is set to 0001: Been to dungeon, and that the radio buttons are set to ON.

Adding this command to the transfer event means that any time the player goes down the steps, the switch will be set to ON. If the switch is already ON, then nothing changes, but if it’s OFF, it’s set to ON.
Save and playtest our game; try talking to the guard both before and after you go to the dungeon and you’ll see what effect the Switch has.
Before:

After:

Magic! Switches are a fundamental part of adding interactivity to an RPG Maker game, so experiment with them. Note that switches are global, which means they carry across between maps and are saved in the player’s save game. That means you can set a switch on one map and have it affect something in a completely different area of the game — good for setting up multi-room puzzles or having long-term consequences for the player’s actions.
Now let’s go down into our dungeon and create some treasure chests. We’ll use this opportunity to take a look at variables, too.
Pick our dungeon map from the sidebar, find an empty space and right-click, choose Quick Event Creation > Treasure…
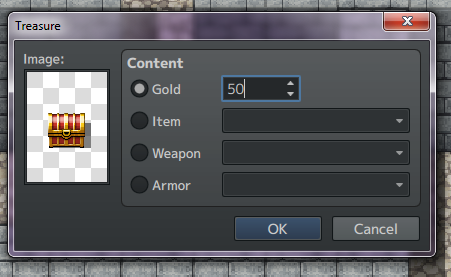
Give the player a bit of gold for their trouble.
Before we move on, right click on the chest we just created and choose Edit… then click on an empty line in the Contents window and choose Control Variables…
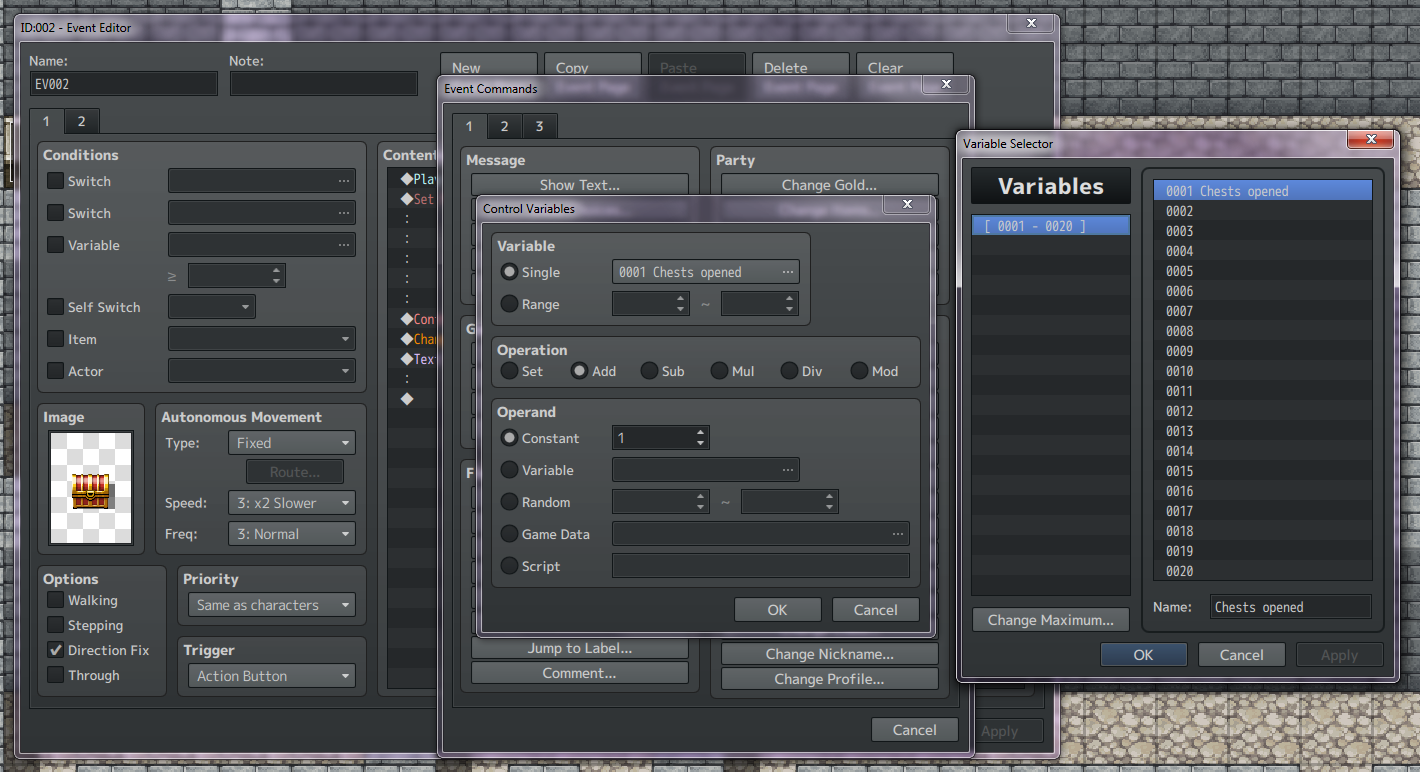
You can name variables in the same way as switches. Call our variable 0001 something like “Chests opened” or the like, then set the Operation to Add and the Operand to Constant: 1. This means that when the player opens the chest, 1 is added to variable 0001: Chests opened.
Now copy and paste our chest around the map a few times. The easiest way to do this is to left-click on it in the editor, press Ctrl-C, left-click on a square where you’d like to put another chest, then press Ctrl-V to paste an exact replica of it. Note that chests will block movement, so try not to block off passageways with them!
Finally, to demonstrate a simple use for variables, create an NPC in the same way we made our guard earlier. Place them somewhere near the entrance to the dungeon. Make their dialogue something along these lines, ensuring you include the \v[1] code, which is replaced with the contents of variable 1 when the message is displayed.

Now go test out our game, open some chests and talk to the NPC.

This is a very simple use of variables, but you can expand on it to do things like requiring the party to perform the same action multiple times to solve a puzzle, change dialogue according to the number of times the player has accomplished something, track scores in minigames and all manner of other things. You can even use the Conditions section of the Event editor like before to make our NPC say something different when you’ve opened all of the chests. See if you can figure out how to do that yourself.

These basic event functions are enough to put together a simple dungeon-crawling RPG, and it’s barely scratching the surface of what RPG Maker has to offer. Getting comfortable with these basics is the best way to get started with RPG Maker; from there, you’ll doubtless develop the confidence to explore the many other options in the Event Commands window, most of which are fairly self-explanatory, but which also have helpful tooltips if you hover your mouse over them for a moment.
While this is enough to put together a solid, respectable Dragon Quest-style RPG, you might find yourself wanting to be a bit more adventurous with your mechanics and presentation. That’s where plugins come in, and that’s what we’re going to take a look at next time.
For now, happy dungeon-crafting!
More about RPG Maker MV
Find out more about RPG Maker MV and download the trial version on the official website.
If you enjoyed this article and want to see more like it, please consider showing your social support with likes, shares and comments, or financial support via my Patreon. Thank you!